


Have you ever wanted to get inside your speaker to clean it or upgrade its parts but didn’t know how to remove the speaker grill? It might seem tricky at first, but with the right steps, you can do it easily without damaging your speaker.
In this guide, you’ll discover simple tips and tricks that make the process quick and safe. Keep reading, and you’ll gain the confidence to take your speaker apart like a pro.
Tools Needed
Removing a speaker grill needs some simple tools. These tools help avoid damage to the speaker or the grill. Using the right tools makes the job easier and safer.
Most speaker grills are held in place by clips, screws, or magnets. Knowing the tools helps you remove the grill without breaking it. Prepare these basic tools before starting the process.
Flathead Screwdriver
A flathead screwdriver is useful for prying the grill gently. It fits under the edge to lift the grill from the frame. Choose one with a thin blade to avoid scratching.
Plastic Pry Tool
A plastic pry tool helps separate the grill without damaging the speaker. It is safer than a metal tool because it won’t scratch surfaces. This tool is perfect for tight spaces.
Phillips Screwdriver
Some grills are fixed with screws. A Phillips screwdriver is needed to remove these screws. Make sure the screwdriver matches the screw size to avoid slipping.
Needle Nose Pliers
Needle nose pliers help remove small clips or pins. They provide a strong grip in hard-to-reach places. Use them carefully to avoid bending or breaking parts.
Soft Cloth
A soft cloth protects the speaker surface during removal. Place it between the tool and speaker frame to prevent scratches. Always handle the speaker with care.

Credit: diy.stackexchange.com
Types Of Speaker Grills
Speaker grills protect the speaker’s delicate parts. They keep dust, dirt, and damage away. Grills come in various types depending on design and material. Knowing these types helps in removing or replacing them safely.
Metal Speaker Grills
Metal grills are strong and last long. They usually have small holes or mesh patterns. Metal grills can be fixed with screws or clips. Removing them may need tools like screwdrivers.
Cloth Speaker Grills
Cloth grills cover the speaker with fabric. They allow sound to pass through easily. Cloth grills are often held by friction or small pins. They can be gently pulled off without tools.
Plastic Speaker Grills
Plastic grills are lightweight and easy to shape. They might snap on or use small clips. Removing plastic grills requires careful prying to avoid damage. Use a flat tool or your fingers.
Magnetic Speaker Grills
Magnetic grills use magnets to stay in place. They are easy to remove by pulling gently. Magnets hold the grill firmly but allow quick removal. No tools are needed for magnetic grills.
Preparing For Removal
Preparing to remove a speaker grill helps avoid damage and frustration. It sets the stage for a smooth process. Taking simple steps before removal makes the task easier and safer.
Gathering the right tools and creating a clean workspace are key. This preparation protects both the speaker and yourself from harm.
Gather Essential Tools
Start by collecting tools like a flathead screwdriver, a plastic pry tool, and a soft cloth. These help in gently lifting the grill without scratching.
Having the right tools ready saves time and effort during the removal process.
Clear The Work Area
Choose a clean, flat surface to work on. Remove clutter to avoid losing small parts like screws or clips.
A tidy space reduces the chance of accidents and damage to the speaker components.
Turn Off And Unplug The Speaker
Always switch off and unplug your speaker before starting. This prevents electric shocks and protects the speaker’s electronics.
Safety first. Never skip this step to keep yourself safe.
Check The Speaker Grill Type
Identify whether the grill is snapped, screwed, or glued on. Different types need different removal methods.
Knowing the grill type helps in choosing the right approach and tools.
Credit: diy.stackexchange.com
Step-by-step Removal Process
Removing a speaker grill can seem tricky. The process depends on the type of grill you have. Follow these simple steps to remove your speaker grill safely. Each type requires a different approach. Keep your tools ready and work gently to avoid damage.
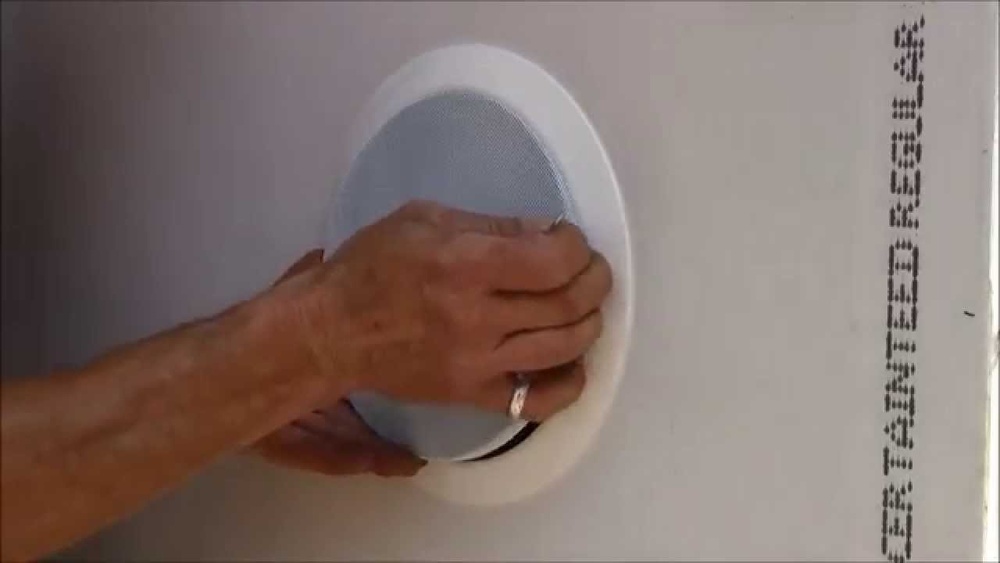
Removing Clip-on Grills
Clip-on grills snap onto the speaker frame. Find the edges where the grill clips connect. Use your fingers or a flat tool to gently pry the grill away. Start from one corner and move slowly around the grill. Avoid using too much force to prevent bending the grill or speaker.
Removing Screwed Grills
Screwed grills are attached with small screws. Locate all screws holding the grill in place. Use a screwdriver that fits the screw heads perfectly. Turn the screws counterclockwise to remove them. Keep the screws safe for reattaching the grill later. Lift the grill off carefully after all screws are out.
Removing Adhesive Grills
Adhesive grills stick to the speaker frame. Heat the edges slightly with a hairdryer to soften the glue. Gently lift the grill starting from a corner. Use a plastic card to slide under the grill and break the adhesive seal. Work slowly to avoid tearing the grill or damaging the speaker surface.
Tips For Preventing Damage
Removing a speaker grill can be tricky. It needs care to avoid damage. Follow simple tips to keep your speaker safe. These tips help you handle the grill gently and correctly.
Use The Right Tools
Choose tools that fit the job. Avoid sharp or heavy objects. A plastic pry tool works best. It prevents scratches and dents on the grill.
Apply Gentle Pressure
Press lightly around the edges of the grill. Do not force it open. Slow and steady pressure avoids bending or breaking parts.
Work In A Clean Area
Keep the workspace clear of dust and dirt. Dirt can scratch the speaker surface. A clean area helps you see screws or clips easily.
Check For Hidden Fasteners
Look for screws or clips holding the grill. Removing these first saves the grill from damage. Never pull the grill before releasing fasteners.
Keep Small Parts Safe
Place screws and clips in a container. Losing small parts can cause problems later. Organized parts make reassembly easier and safer.
Cleaning And Maintenance After Removal
Cleaning and maintenance after removing a speaker grill help keep your speaker in good shape. Dust and dirt can build up over time, affecting sound quality. Taking time to clean the grill and the speaker area improves performance and extends the life of your device.
Simple steps keep your speaker safe and working well.
Cleaning The Speaker Grill
Use a soft brush or cloth to remove dust from the grill. Avoid using water or cleaning sprays that can damage the material. For stubborn dirt, gently wipe the grill with a slightly damp cloth. Let it dry completely before putting it back on the speaker.
Cleaning The Speaker Surface
Use a dry, soft cloth to wipe the speaker surface. Avoid pressing hard to prevent damage to the speaker cone. Remove any dust or debris carefully. Keep liquids away from the speaker parts to stop moisture damage.
Align the grill carefully with the speaker frame. Press gently but firmly to snap it back into place. Check that it fits evenly and securely. Avoid forcing the grill, which can cause breaks or scratches.
Reinstalling The Speaker Grill
Reinstalling the speaker grill is a simple but important step. It protects the speaker from dust and damage. Doing it right keeps your speaker safe and looking good.
Take your time. Align the grill carefully. A loose fit can cause problems with sound quality or even damage the speaker.
Preparing The Speaker And Grill
Clean the speaker surface gently. Remove dust or dirt. Check the grill for any damage. Make sure all clips or magnets are in place. This helps the grill attach properly.
Aligning The Grill Correctly
Match the grill with the speaker shape. Line up the edges evenly. Pay attention to any openings or logos. Proper alignment avoids gaps and protects the speaker well.
Securing The Grill In Place
Press the grill gently but firmly. If it uses clips, snap them carefully. For magnetic grills, bring the grill close until it sticks. Avoid forcing the grill or bending it.
Testing The Reinstalled Grill
Play some music at low volume. Listen for any rattling or loose parts. Check if the grill stays in place. Adjust if needed to ensure a snug fit.
Credit: www.reddit.com
Frequently Asked Questions
How Do I Safely Remove A Speaker Grill?
To remove a speaker grill safely, gently pry it using a plastic tool or your fingers. Avoid using metal tools to prevent damage. Work slowly around the edges to release clips without bending the frame or tearing the fabric.
Can I Remove Speaker Grills Without Tools?
Yes, many speaker grills can be removed by hand. Grip the edges firmly and pull gently. Some grills use magnetic attachments or clips that release with slight pressure. Be cautious to avoid damaging the speaker or grill fabric.
Why Remove A Speaker Grill?
Removing a speaker grill helps clean dust or check the speaker drivers. It can also improve sound clarity or allow for grill replacement. Removing the grill is necessary for repairs or upgrades as well.
Will Removing The Speaker Grill Affect Sound Quality?
Removing the speaker grill can slightly improve sound clarity by reducing obstruction. However, grills protect drivers from dust and damage. Balance sound enhancement with protection needs when deciding to remove the grill.
Conclusion
Removing a speaker grill is a simple task anyone can do. Start by checking how the grill is attached. Use gentle tools to avoid damage. Take your time and work carefully. This helps keep your speaker safe and sound. Now, you can clean or replace the grill easily.
Try these steps next time your speaker grill needs attention. Simple and careful work brings good results.