


When your car refuses to start, frustration can quickly set in. You might wonder if the battery is dead or if there’s a more complex issue at hand.
One crucial component to consider is the starter. Understanding how to check the starter on a car not only saves you time and money but also empowers you with a sense of control over your vehicle’s health. Imagine confidently diagnosing the problem yourself and knowing exactly what to do next.
In this guide, you’ll discover simple steps to check your car’s starter, ensuring you’re not left stranded. Stay with us, and unlock the secrets to keeping your car reliable and ready to roll.
Signs Of A Faulty Starter
Strange noises or a clicking sound when starting your car could indicate a faulty starter. A sluggish engine crank or intermittent starting failures also suggest starter problems. Regular checks can help identify these issues early.
If your car doesn’t start, a faulty starter could be the culprit. Recognizing the signs of a failing starter can save you time and money on repairs. Knowing what to look out for might even prevent you from being stranded in inconvenient situations. ###Common Symptoms
A faulty starter often shows clear symptoms. One of the most common is the car’s engine not cranking despite the battery being fully charged. Have you ever turned the key and heard nothing but silence? That could mean the starter is failing to engage. Another symptom is intermittent starting. Sometimes your car starts perfectly, while other times, it refuses to start. This inconsistency can be frustrating and is a red flag. It’s like your car is playing a game of will-it-or-won’t-it with you. ###Unusual Noises
Listen closely when you try to start your car. Do you hear a grinding noise? This sound often indicates that the starter drive gear is worn out or not engaging properly. Ignoring this noise could lead to more expensive repairs down the line. A clicking sound is another common noise associated with a faulty starter. This click means the starter solenoid is trying to work but can’t make a connection. Imagine trying to light a match with a wet matchstick. Frustrating, right? Have you ever heard a whirring noise when starting your car? This sound suggests the starter motor is spinning, but not engaging with the engine. It’s a bit like a bike chain slipping off the gears. You’re pedaling, but you’re not going anywhere. Are you experiencing any of these symptoms? If so, it might be time to check your starter. Addressing these issues early can save you from a potential breakdown.
Credit: www.howacarworks.com
Safety Precautions
Ensuring safety while checking the starter on your car is crucial. Proper precautions protect you from accidents and injuries. Follow these safety guidelines to maintain a secure environment during your inspection.
Wearing Protective Gear
Always wear protective gloves to avoid burns and cuts. Safety glasses shield your eyes from sparks or debris. Closed-toe shoes protect your feet from falling objects.
Ensuring A Stable Environment
Park your car on a flat surface to prevent rolling. Engage the parking brake for extra stability. Ensure good lighting to see clearly under the hood. Avoid working in wet conditions to reduce electrical risks.
Tools Required
Testing a car starter requires a few essential tools: a multimeter for electrical checks and a wrench set for loosening connections. Having a jump starter can help if the battery is low. Safety gloves ensure protection while handling the starter and battery.
Checking the starter on your car can save you a trip to the mechanic and help you understand more about your vehicle’s inner workings. Before you dive into the process, it’s crucial to have the right tools. Having the right equipment not only makes the job easier but also safer. Imagine trying to solve a puzzle without the correct pieces; frustrating, right? Let’s make sure you have all the pieces you need to get started.Essential Tools
To successfully check your car’s starter, you’ll need a few basic tools. A multimeter is essential for testing the electrical system. It measures voltage, current, and resistance, helping you diagnose the issue accurately. A socket set is another must-have. You’ll use this to remove nuts and bolts when accessing the starter. Make sure you have the correct size sockets for your car model. A jack and jack stands are necessary for safety. They support the car when you’re working underneath it. Safety should always be your priority. Having a battery charger on hand can be very helpful. It ensures the battery is fully charged, eliminating it as a potential cause for starter issues.Optional Equipment
While the essential tools will get the job done, a few optional tools can make the process smoother. A test light can help you quickly check for electrical flow, offering a simple alternative to a multimeter. A torque wrench ensures you tighten bolts to the correct specifications. This tool is particularly useful if you plan to replace the starter. An inspection mirror allows you to see hard-to-reach places. It’s handy when checking connections and mounting bolts. Finally, consider using rubber gloves for protection. They keep your hands clean and safe from any sharp edges or grime. Do these tools sound familiar to you? Maybe you’ve used them for other car repairs. If not, consider investing in them. They can be game-changers in your DIY toolbox. With these tools, you’re well-equipped to tackle the starter check. Are you ready to get your hands dirty and learn more about your car?Credit: www.youtube.com
Locating The Starter
Locating the starter in your car is the first step in checking it. The starter is a small but essential part of your vehicle. It helps start the engine by turning it over. Finding it can be tricky if you don’t know where to look. This guide will help you locate the starter with ease.
Typical Starter Locations
In most vehicles, the starter is near the engine’s base. It’s usually found on the driver’s side. Some cars have it hidden under engine components. Trucks and large SUVs might have starters in the middle of the engine. Always check around the engine block’s lower area. This is a common spot for starters.
Consulting The Manual
Your car’s manual is a valuable resource. It will show the exact location of the starter. Look for a section on engine components. This section often has diagrams. These diagrams can point you directly to the starter. Having the manual handy can save you time and effort.
Testing The Starter
Testing the starter involves checking electrical connections and listening for clicking sounds when turning the key. Inspect battery cables for corrosion and ensure they are tightly connected. Listen for unusual noises, which could indicate starter issues needing attention.
Testing the starter is crucial for diagnosing car issues. A malfunctioning starter can prevent your car from starting, leaving you stranded. Whether you’re a seasoned mechanic or a curious car owner, learning how to test the starter can save you time and money. You don’t need to be an expert, but a little hands-on knowledge can make a big difference. Let’s dive into the practical steps you can take to check if your starter is working properly.Visual Inspection
Begin with a simple visual inspection. Look under the hood and locate the starter. It’s usually near the engine and connected to the battery. Check for any visible damage, like cracks or corrosion on the starter or its connections. Clean connections are crucial for good electrical flow. If you notice rust or dirt, clean them using a wire brush or sandpaper. Sometimes, just tightening the bolts and ensuring everything is secure can solve your problem. Have you noticed any burnt wires or a strange smell? That might indicate overheating. This could be a sign of a deeper issue with the starter or surrounding components.Using A Multimeter
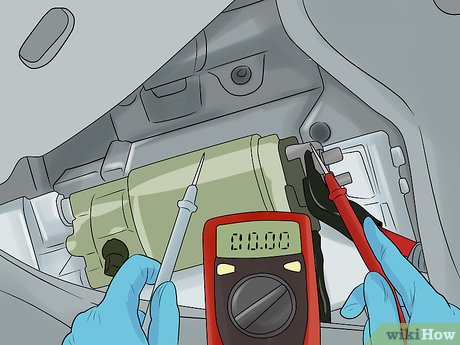
A multimeter is a handy tool for testing the starter’s electrical circuits. Set it to measure voltage, typically on the DC setting. Connect the multimeter probes to the starter’s terminals. Check the voltage while trying to start the car. A reading below 12 volts could mean your starter isn’t receiving enough power. This could be due to a weak battery or faulty wiring. Feeling confident with the basics? Try the continuity test. This checks if the starter motor is making a complete circuit. Place the multimeter on the ohms setting and connect it to the starter’s terminals. If the reading is infinite, the starter might be broken internally. Remember, testing the starter can be straightforward with a few tools and a bit of patience. Have you ever had a moment when your car wouldn’t start, but a quick DIY check saved the day? Knowing how to test the starter can empower you to tackle these challenges head-on.Starter Solenoid Check
The starter solenoid is crucial for starting your car. It acts as a bridge, directing electricity from the battery to the starter motor. A faulty solenoid can prevent your car from starting. Checking the starter solenoid ensures that this component functions properly. Follow these steps to identify and test your solenoid.
Identifying The Solenoid
Locate the starter solenoid under the hood. It is usually near the battery. It looks like a small cylindrical device. Check for wires connecting to it. These wires link the solenoid to the battery and starter motor. Ensure the solenoid is clean and free from corrosion. Corrosion can affect its performance.
Performing The Test
Testing the solenoid requires a multimeter. Set the multimeter to measure voltage. First, disconnect the negative battery cable. This prevents any electrical accidents. Next, connect the multimeter’s positive lead to the solenoid terminal. Connect the negative lead to the solenoid body. Turn the ignition key to the start position. Observe the multimeter reading. A healthy solenoid should show voltage. No voltage indicates a problem. Replace the solenoid if necessary.
Battery And Wiring Inspection
Inspecting the battery and wiring is crucial for diagnosing starter issues. The battery supplies power to the starter. Proper connections ensure efficient power flow. Faulty wiring can hinder the starter’s function. Start by examining battery connections and wiring integrity. These steps help in identifying potential problems that might affect your car’s starting system.
Checking Battery Connections
Examine the battery terminals for corrosion. Corrosion appears as a white, powdery substance. Clean it with a mixture of baking soda and water. Ensure the terminals are tight. Loose connections may cause starting problems. Use a wrench to tighten them securely.
Assessing Wiring Integrity
Inspect the wires connected to the starter. Look for visible damage or fraying. Damaged wires can disrupt the electrical flow. Use a multimeter to check the voltage. The voltage should match the battery’s output. If not, there might be a wiring issue. Replace damaged wires promptly to avoid further problems.
Credit: www.howacarworks.com
Professional Assistance
Checking the starter on a car can be challenging. Sometimes, understanding car mechanics requires professional expertise. If you’re unsure or uncomfortable, seeking help is wise. Professionals can ensure accurate diagnosis and prevent further issues. Their experience and tools make them reliable for complex checks and repairs. Trusting a professional saves time and stress.
When To Seek Help
Not every car problem needs a mechanic. Some issues are simple to fix. However, certain signs indicate a need for expert help. Strange noises when starting the car suggest starter problems. If the car struggles to start, it might be time to call a mechanic. Frequent issues with starting are a red flag. Seek professional assistance to avoid further damage.
Choosing A Reliable Mechanic
Finding a trustworthy mechanic is crucial. Look for mechanics with good reviews. Ask friends for recommendations. Check credentials and certifications. A reliable mechanic should have experience with your car model. Verify their expertise in starter issues. Good communication is a sign of a reliable service. Ensure they explain the problem clearly. Their ability to answer questions matters. Choose a mechanic who prioritizes your car’s health.
Frequently Asked Questions
How To Test If A Starter Is Bad?
To test if a starter is bad, check for clicking sounds when turning the key. Inspect for dimming headlights, which indicate low power. Test the starter motor’s voltage with a multimeter. Verify connections for corrosion or looseness. If issues persist, consider professional diagnosis.
Can You Test A Starter Without Removing It?
Yes, you can test a starter without removing it. Use a multimeter to check voltage and current. Ensure all connections are tight. Listen for clicking sounds when starting. These steps help diagnose starter issues.
Can I Jump Start A Car With A Bad Starter?
Jump-starting a car won’t fix a bad starter. The starter is responsible for turning the engine over. If it’s faulty, no amount of battery power will help. You might need to replace the starter or get professional assistance to resolve the issue effectively.
Will Autozone Test A Starter?
AutoZone typically doesn’t test starters directly. They can test your car battery and alternator to diagnose electrical issues. Visit your local AutoZone for assistance with starter-related problems. They offer free battery, alternator, and check engine light services to help identify potential issues.
Conclusion
Checking your car’s starter is simpler than you think. Start by inspecting the connections. Tighten loose wires. Listen for clicking sounds. This helps identify issues. Test the battery voltage. A weak battery affects the starter. Use a multimeter for accurate readings.
If problems persist, consult a professional. A mechanic can diagnose complex issues. Remember, regular maintenance is key. It prevents starter troubles in the future. Keep your car running smoothly. Follow these steps and ensure your starter is in good condition.
Safe driving!