


Is your car struggling to start, or are your headlights dimmer than usual? Your alternator might be the culprit.
Knowing how to test a car alternator can save you time, money, and a lot of frustration. Imagine being able to diagnose the problem yourself without having to rely on expensive mechanics. It’s not as daunting as it sounds, and with the right guidance, you’ll be inspecting your alternator like a pro.
By understanding the signs and knowing how to test it correctly, you can ensure your car runs smoothly and avoid unexpected breakdowns. Dive in, and let’s get your car back to its reliable best!

Credit: www.autozone.com
Signs Of A Faulty Alternator
Recognizing the signs of a faulty alternator can save you time and money. An alternator powers your car’s electrical system. If it fails, your car could experience serious issues. Watch for these signs to catch problems early.
Dimming Lights
Notice your headlights or dashboard lights dimming? This could be an alternator issue. The alternator powers these lights. If it can’t supply enough power, they may flicker or dim. It’s a common warning sign.
Battery Warning Light
Does the battery warning light appear on your dashboard? This light often indicates alternator problems. Your car’s computer detects a power issue. It’s alerting you to check your alternator. Don’t ignore this signal.
Electrical Failures
Experiencing electrical failures? These could be caused by a faulty alternator. Power windows, radio, or air conditioning might not work well. These systems rely on the alternator for power. If they fail, your alternator might be the culprit.
Credit: www.youtube.com
Gathering Necessary Tools
Testing a car alternator requires the right tools. Proper tools ensure accurate results and safety. Preparing the necessary equipment saves time and hassle. This guide details the essential tools needed for the task.
Multimeter
A multimeter is crucial for testing an alternator. It measures voltage, current, and resistance. Ensure the multimeter is digital and reliable. A clear display helps read measurements easily. Set the multimeter to the DC voltage setting. This is essential for testing car alternators.
Safety Gear
Safety gear is vital when working with car electronics. Wear safety gloves to protect your hands. Use goggles to shield your eyes. This gear prevents injuries from sparks or debris. Always prioritize safety during testing.
Alternator Testing Kit
An alternator testing kit simplifies the process. It usually includes connectors and instructions. Some kits have adapters for different vehicles. They help test alternator output and performance. Choose a kit compatible with your vehicle model. This ensures accurate and efficient testing.
Safety Precautions
Testing a car alternator is crucial for vehicle health. Safety precautions are essential to prevent accidents or equipment damage. Follow these guidelines to ensure a safe testing environment. Each step plays a critical role in protecting you and your vehicle.
Disconnecting The Battery
Before testing, disconnect the car battery. This prevents electric shocks. Use a wrench to loosen the negative terminal. Remove the cable carefully. This step stops accidental short circuits. It also protects sensitive electronics in the car.
Proper Ventilation
Ensure the area has proper ventilation. Car batteries can emit harmful gases. These gases are dangerous in enclosed spaces. Open windows or doors for fresh air. This reduces the risk of inhaling toxic fumes. Safety is always a priority.
Wearing Protective Gear
Wear protective gear during testing. Safety glasses protect your eyes. Gloves protect your hands from sharp edges. Clothing should cover your arms. This reduces the risk of burns or cuts. Proper gear provides an extra layer of safety.
Visual Inspection
Checking a car alternator starts with a visual inspection. Look for worn belts, loose connections, and corrosion. Ensure all components appear intact and secure before proceeding with further tests.
Testing your car alternator is crucial to ensure it functions effectively, and a visual inspection is often the first and most straightforward step. It doesn’t require any special tools, just a keen eye and a bit of patience. This initial check can help you spot obvious issues that might be affecting your alternator’s performance. Let’s dive into how you can perform a visual inspection effectively.Checking The Belts
Pop your car’s hood and take a good look at the belts connected to the alternator. They should be tight, without any visible cracks or signs of wear. A loose or worn-out belt can lead to poor alternator performance. Once, my own car’s alternator belt had a slight crack that went unnoticed until a visual inspection saved me from a much bigger problem.Inspecting Connections
Next, examine the electrical connections attached to the alternator. They should be secure and free from any fraying or damage. Loose or damaged connections can lead to erratic charging, leaving your battery undercharged. Think about it: Have you ever experienced flickering lights or a stubbornly dying battery? It might just be those connections needing a simple fix.Looking For Corrosion
Corrosion can be a silent killer for alternator performance. Look for any greenish or whitish powder around the terminals. This buildup can hinder the electrical flow, causing charging issues. If you spot corrosion, a simple cleaning with a wire brush or a bit of baking soda and water can work wonders. Remember the time your phone charger port was dirty, and a quick clean solved everything? Your alternator might appreciate the same care. A visual inspection might seem basic, but it can provide valuable insights into your alternator’s health. Have you checked your car’s alternator lately? A few minutes could save you hours of trouble later.Using A Multimeter
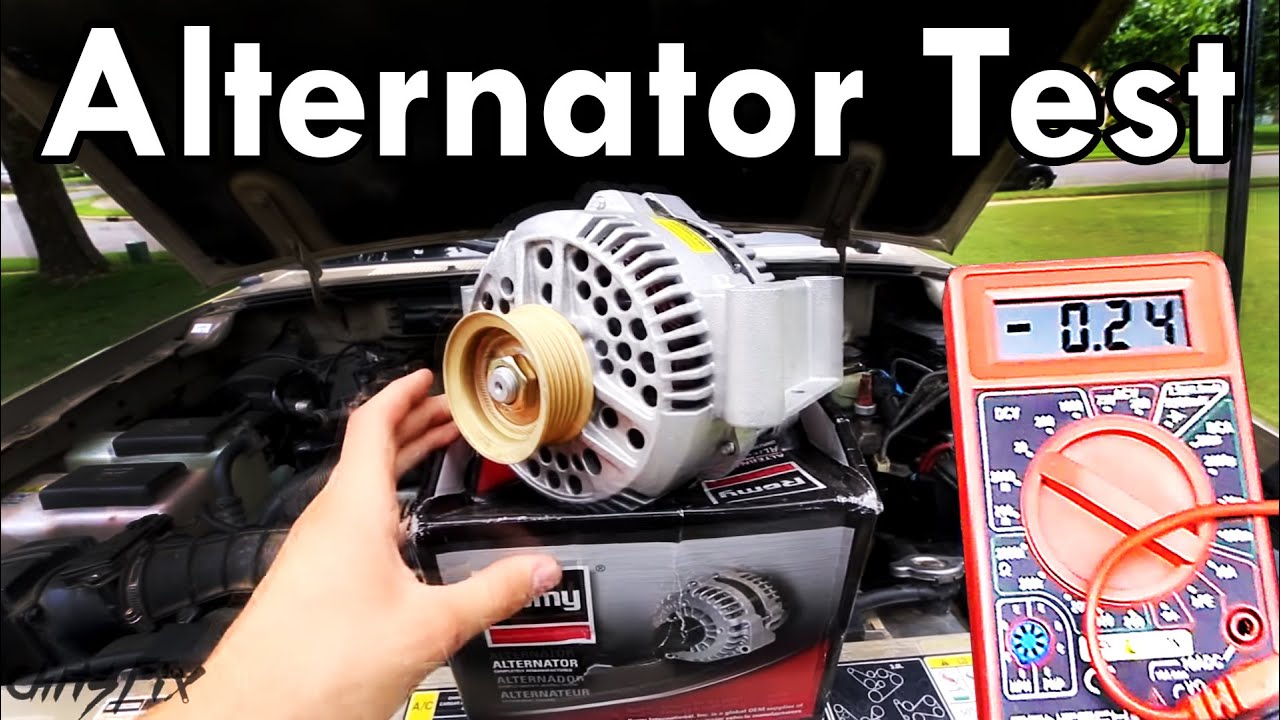
Testing a car alternator with a multimeter involves simple steps. Set the multimeter to DC voltage mode. Connect it to the battery terminals. Start the engine and check the voltage. A healthy alternator should show between 13. 5 to 14.
5 volts.
Testing your car alternator is essential for vehicle maintenance. A multimeter is an effective tool for this task. It helps identify alternator issues. Below is a guide on how to use a multimeter for testing.Setting Up The Multimeter
Start by setting your multimeter to measure DC voltage. This setting usually has a “V” symbol with straight lines. Ensure your car is off before beginning. Connect the black probe to the battery’s negative terminal. Connect the red probe to the positive terminal. This setup will help you measure the voltage accurately.Testing Voltage Output
Start the car engine and let it idle. Check the multimeter reading. A healthy alternator should show between 13.5 and 14.5 volts. If the reading is below 13 volts, the alternator may not be charging the battery. A reading above 15 volts can indicate overcharging. Both situations require further inspection.Assessing Alternator Performance
Increase the engine’s RPM to around 2,000. Observe the multimeter reading once more. The voltage should remain stable between 13.5 and 14.5 volts. Fluctuations may suggest alternator issues. Listen for unusual sounds from the alternator. Strange noises can be a sign of wear. Regular checking ensures optimal alternator performance.Load Testing
Testing a car alternator involves checking its voltage output. Use a multimeter to measure this. A healthy alternator should output between 13. 8 to 14. 2 volts. Ensure your car’s battery is fully charged for accurate results. This helps prevent vehicle electrical issues and ensures smooth operation.
Testing your car’s alternator is crucial to ensure it functions properly and keeps your vehicle running smoothly. One effective way to do this is through load testing. This method checks the alternator’s performance under stress, simulating real-world driving conditions. Ready to dive into the essentials of load testing your alternator? Let’s break it down. ###Simulating Electrical Load
Load testing involves creating a scenario where the alternator has to work harder. To do this, you’ll need to simulate an electrical load. Turn on multiple electrical components in your car, like the headlights, radio, and air conditioning. This puts extra demand on the alternator, mimicking the stress it faces during everyday use. You might find it interesting how different combinations of electrical loads affect the alternator. Ever wondered if turning on just the headlights uses as much power as the air conditioning? This test gives you real-time insights. ###Interpreting Results
Once you’ve simulated the load, it’s time to interpret the results. Use a multimeter to measure the voltage output. A healthy alternator should read between 13.8 and 14.8 volts. If the reading falls outside this range, it might be time for repairs or replacements. Did you know some alternators perform poorly under load but seem fine when idling? That’s why interpreting these results is so crucial. ###Identifying Potential Issues
Load testing can help identify hidden problems. If your alternator struggles to maintain voltage, it could be a sign of worn-out components or faulty wiring. You should also listen for unusual noises during the test. A grinding or whining sound might indicate that the alternator’s bearings are failing. This proactive approach can save you from unexpected breakdowns on the road. Have you ever thought about the consequences of ignoring these signs? A failing alternator can leave you stranded, turning a minor inconvenience into a major hassle. Regular load testing can help you avoid such pitfalls. By understanding how to test your alternator effectively, you empower yourself to maintain your vehicle better. Are you ready to give it a try and see how your alternator stands up to the challenge?Alternator Replacement
Testing a car alternator ensures it provides enough power for your vehicle. Start by checking the battery voltage with a multimeter. Then, monitor the alternator output to confirm it charges the battery properly.
When your car’s alternator fails, it can leave you stranded with a dead battery. Alternator replacement is a critical process to restore your vehicle’s electrical system to optimal performance. It’s not just about swapping parts; it’s about choosing the right replacement and ensuring everything is functioning perfectly afterward. Let’s walk through the key steps in making sure your alternator replacement is successful.Choosing The Right Alternator
Before you even think about installation, it’s crucial to select the correct alternator for your car. Check your vehicle’s manual or consult with a trusted mechanic to know the specifications required. Consider factors like power output and compatibility with your car model. Don’t be tempted by cheaper options that don’t meet your car’s needs. They can lead to problems down the road. Investing in a quality alternator is a long-term saving.Installation Process
With the right alternator in hand, you’re ready to install. Start by disconnecting the car battery to prevent any electrical mishaps. Remove the serpentine belt and any obstructing components to access the alternator. Once you’ve removed the old alternator, carefully position the new one. Secure it with bolts, reconnect the electrical connections, and replace the serpentine belt. Follow your car’s manual for specific torque settings.Post-replacement Checks
After installation, it’s time to ensure everything is working correctly. Reconnect the battery and start the engine. Check the dashboard for any warning lights indicating a problem. Listen for unusual noises that might suggest improper installation. Additionally, use a multimeter to measure the voltage output to confirm the alternator is charging the battery effectively. Why not take your car for a short drive to ensure that the electrical systems are functioning smoothly? This real-world test can help you catch any issues you might have overlooked. Replacing an alternator might seem daunting, but with careful attention to detail and the right information, you can do it successfully. Have you ever replaced an alternator yourself, or do you prefer leaving it to the professionals?Maintenance Tips
Proper maintenance of your car’s alternator is vital for its longevity. Regular checks can prevent unexpected issues. Keep everything running smoothly with these easy maintenance tips. They help ensure your vehicle stays in top condition.
Regular Inspections
Inspect the alternator every few months. Look for signs of wear or damage. Check the belt for cracks or fraying. A worn belt can affect the alternator’s performance. Listen for unusual noises. Squealing sounds can indicate a problem. Prompt attention to these signs avoids bigger issues.
Keeping Connections Clean
Dirty or corroded connections can cause alternator problems. Regularly clean the terminals and connectors. Use a wire brush to remove corrosion. Ensure all connections are tight and secure. Loose connections can disrupt the electrical flow. A clean alternator works more efficiently.
Monitoring Electrical System
Keep an eye on your car’s electrical system. Look for dimming lights or slow power windows. These could signal alternator issues. Use a multimeter to check voltage output. It should read between 13.5 and 14.5 volts. Consistent monitoring helps catch problems early.
Credit: www.familyhandyman.com
Frequently Asked Questions
How Do I Test To See If My Alternator Is Bad?
Use a multimeter to test your alternator. Set it to DC voltage and measure battery voltage with the engine off. Start the engine and check voltage again. A healthy alternator should show 13. 8 to 14. 5 volts. If the voltage is lower, the alternator may be failing.
Which Battery Cable Do You Take Off To Test The Alternator?
Disconnect the negative battery cable to test the alternator. Ensure safety by wearing protective gear and following proper procedures.
Can Autozone Test My Alternator?
Yes, AutoZone can test your alternator for free. Visit a nearby store to have it checked by their staff. They use specialized tools to diagnose issues, ensuring your vehicle’s electrical system runs smoothly. Contact your local AutoZone for more details.
How Can I Test My Alternator Without A Tester?
Start the car and disconnect the battery’s negative cable. If the engine continues running, the alternator works. Check headlights brightness; dim lights may signal alternator issues. Listen for unusual noises from the alternator area. Inspect belts for wear or damage.
These steps can help test your alternator without a tester.
Conclusion
Testing a car alternator is simple and essential. It ensures your vehicle runs smoothly. Regular checks prevent unexpected breakdowns. Use a voltmeter for accurate readings. Listen for unusual noises. Inspect the battery for signs of wear. These steps help maintain your car’s health.
A well-functioning alternator powers your car effectively. Save time and money by testing it regularly. Stay proactive with maintenance. Your car will thank you. Remember, a little effort goes a long way. Keep your car in top shape with these straightforward tips.
Reliable performance starts with a healthy alternator.