


Have you ever turned your car key, only to hear a disheartening click or, worse, silence? You might be dealing with a faulty starter.
Before you rush to call a mechanic, know that testing your car’s starter is something you can do yourself with a little guidance. Imagine saving time and money by diagnosing the issue right from your driveway. Understanding how to test a starter isn’t just for car enthusiasts; it’s for anyone who wants to be proactive about car maintenance and avoid unnecessary repair costs.
This guide will walk you through the simple steps to test a starter on your car, empowering you with knowledge that could make all the difference next time your car refuses to start. Dive in, and discover how easy it can be to keep your car running smoothly.
Tools And Materials Needed
Testing the starter of a car involves using specific tools and materials. These items help diagnose issues efficiently and safely. You need to gather them before starting the test.
Multimeter
A multimeter measures electrical voltage and current. It checks the starter’s electrical connections. Ensure it has fresh batteries for accurate readings.
Socket Set
A socket set helps remove the starter from the engine. Choose a set compatible with your car model. This ensures easy handling and minimizes damage.
Wrenches
Wrenches are essential for loosening bolts and nuts. They help access the starter without causing harm. Ensure you have different sizes for various tasks.
Safety Gloves
Safety gloves protect your hands from cuts and burns. They are crucial when working under the hood. Choose durable gloves for maximum protection.
Battery Charger
A battery charger checks if the starter receives power. It prevents false diagnosis from a drained battery. Ensure it’s compatible with your car’s battery type.
Flashlight
A flashlight illuminates dark engine areas. It helps spot the starter and connections. Choose a bright, durable flashlight for clear visibility.
Jack And Jack Stands
Jack and jack stands lift the car safely. They provide access to the starter from underneath. Ensure they are stable and rated for your car’s weight.

Credit: www.youtube.com
Safety Precautions
Testing a car starter involves handling electrical components and moving parts. Ensuring safety is crucial during this process. Proper precautions prevent accidents and ensure smooth operations. Below are essential safety measures to follow.
Wear Protective Gear
Always wear gloves and safety goggles. Gloves protect your hands from electrical shocks. Goggles shield your eyes from flying debris.
Disconnect The Battery
Before testing, disconnect the car battery. This stops accidental electrical discharge. Use a wrench to safely remove the cables.
Work In A Well-ventilated Area
Choose a space with good airflow. This reduces the risk of inhaling harmful fumes. Ensure the area is free from flammable materials.
Use Insulated Tools
Insulated tools prevent electrical shocks. They offer a protective layer against live currents. Check tool insulation before use.
Avoid Loose Clothing
Wear snug-fitting clothes while working. Loose clothing can get caught in moving parts. Keep hair tied back and secure.
Ensure Car Stability
Park the car on a flat surface. Use wheel chocks to prevent movement. Stability ensures safety during testing.
Locating The Starter
Trying to find the starter in your car might feel like searching for buried treasure. It’s a key component, yet it often seems hidden in the depths of your engine. Understanding where it is and how to access it can make a world of difference when your car refuses to start. Whether you’re a seasoned mechanic or a beginner, locating the starter can be straightforward with the right approach.
Identifying The General Location
The starter is usually mounted near the engine block. In most cars, it’s tucked away towards the bottom of the engine, close to where the engine connects to the transmission. If you’re looking under the hood, glance towards the lower part of the engine on the driver’s side.
Referencing Your Car’s Manual
Your car’s manual is a valuable resource. It provides a diagram of the engine layout, including the starter’s exact position. If you’re unsure, flipping through those pages can save you time and frustration.
Looking Under The Car
Sometimes, you might need to get a little dirty. If you can’t spot the starter from above, try looking underneath the car. Ensure your car is securely lifted and supported before you slide under. The starter is often visible from below, nestled near the transmission.
Using Online Resources
Online forums and videos can be lifesavers. Many car enthusiasts share their tips and tricks for finding and testing starters. A quick search with your car’s make and model might reveal helpful insights from others who’ve been in your shoes.
Seeking Help From A Friend
Sometimes, two pairs of eyes are better than one. If you’re stuck, ask a friend to lend a hand. They might spot something you’ve overlooked. Plus, teamwork can make the task more enjoyable.
Locating the starter is just the beginning. How often have you thought, “What if I can fix this myself?” The thrill of solving car issues can be empowering. Once you find the starter, testing it becomes the next adventure. Are you ready to take on the challenge?
Testing For Power
Testing a car’s starter involves checking for power. First, locate the starter and ensure connections are tight. Next, use a multimeter to measure voltage at the starter terminals. A healthy starter should show consistent power flow, indicating proper function.
Testing for power in your car’s starter is crucial to ensure it’s functioning correctly. A faulty starter can leave you stranded, so knowing how to check its power is essential. This process involves a few steps that anyone can learn, even if you’re not a car expert. Whether you’re a seasoned mechanic or just someone who likes to tinker with their car, these tips will guide you through testing the power of your starter effectively. ###Using A Multimeter
To start, you’ll need a multimeter, a handy device that measures electrical values. Set your multimeter to the voltage setting. Ensure it’s set to DC voltage, as car batteries operate on direct current. Connect the multimeter’s red probe to the starter’s positive terminal and the black probe to a metal surface on the engine block for grounding. You should see a reading on the multimeter. If the voltage is below 12 volts, the starter might not be receiving enough power. Did you know that a multimeter can save you hundreds in repair costs? It’s a small investment with big returns. Consider this: my friend once thought his car starter was dead, but a quick multimeter check revealed a loose connection. A simple fix saved him a trip to the mechanic and a hefty bill. ###Checking Battery Voltage
Before you blame the starter, always check the battery voltage. A weak battery might be the real culprit. First, ensure your battery is fully charged. A fully charged car battery should read around 12.6 volts. Place the multimeter probes on the battery terminals—red to positive and black to negative. If the reading is below 12 volts, your battery might need a charge or replacement. A good battery is the heart of your car’s electrical system. Without it, your starter won’t get the power it needs to function. Isn’t it interesting how something as small as a battery can cause so much trouble? Imagine you’re ready for a road trip, and your car won’t start. Checking the battery first could save your day. Have you ever thought about how much you rely on your car starting effortlessly every time you turn the key? Testing the power ensures peace of mind and keeps your car running smoothly. Wouldn’t it be better to spot the issue early rather than face an unexpected breakdown?Inspecting Electrical Connections
Inspecting electrical connections is key when testing a car starter. Faulty connections can lead to starter issues. Often, the problem lies in the cables or their connections. This section guides you through examining and tightening these connections. A simple process anyone can follow.
Examining Cables
First, check the cables connected to the starter. Look for any signs of wear or damage. Cracks, frays, or corrosion indicate a problem. Such issues disrupt electrical flow. Use a flashlight to inspect hard-to-see areas. Ensure the cables are intact and in good condition.
Tightening Loose Connections
Next, ensure all connections are tight. Loose connections can lead to starter failure. Use a wrench to tighten any loose nuts or bolts. Hold the cable firmly while tightening. This prevents further loosening. A secure connection ensures reliable starter performance.
Credit: www.discountstarterandalternator.com
Testing The Solenoid
Testing the solenoid involves checking electrical connections and listening for clicks during ignition. Ensure battery power flows correctly to activate the starter. Faulty solenoids can cause starting issues in cars.
Testing the solenoid is crucial in diagnosing starter issues in a car. The solenoid’s role is vital in the starter system’s operation. It controls the flow of electricity from the battery to the starter motor. Understanding how the solenoid works and testing it accurately can help pinpoint problems. This process can be straightforward and can save time and money.Understanding Solenoid Function
The solenoid is an electrical device. It acts as a switch for the starter motor. When you turn the ignition key, the solenoid engages. It completes the circuit between the battery and starter motor. This action allows the engine to start. If the solenoid fails, the engine will not crank. Understanding its function helps in identifying issues quickly.Solenoid Click Test
The solenoid click test is simple and effective. First, ensure the car is in park or neutral. Turn the ignition key and listen for a clicking sound. A single click often means the solenoid is working. Multiple clicks or no sound could indicate a problem. These sounds suggest the solenoid may not be receiving enough power or is faulty. This test is an easy first step in diagnosing starter problems.Conducting A Bench Test
Testing a car starter begins with disconnecting the battery. Connect jumper cables to the starter. Listen for a clicking sound, indicating functionality. No noise suggests potential issues.
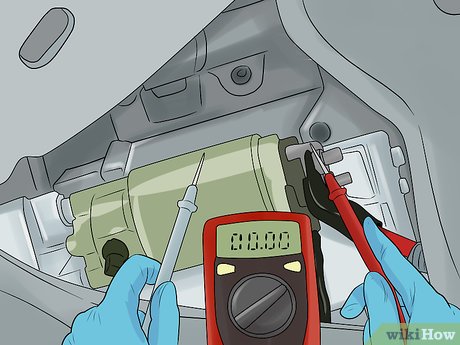
Testing a car starter can save you time and money, helping you diagnose whether a replacement is necessary or if a simple repair will do. Conducting a bench test is a straightforward way to assess the functionality of your starter. It involves removing the starter from your vehicle and testing it independently. Ready to get your hands a little dirty? Let’s dive in.Removing The Starter
Before starting, ensure the car battery is disconnected to avoid any accidental shocks. Locate the starter, typically found near the bottom of the engine. You’ll need basic tools like a wrench and screwdriver to detach it. Once you’ve located the starter, take a good look at it. Is it dusty or oily? This might indicate other issues like leaks that you may need to address. Carefully disconnect the wires attached to it, noting their positions for easy reconnection later.Setting Up The Test
With the starter removed, you need a power source. A fully charged car battery will work perfectly. Place the starter on a stable surface. Connect jumper cables from the battery to the starter. Attach the positive cable to the starter’s terminal and the negative to its housing. Be cautious and ensure the connections are secure. When you’re ready, briefly touch a small wire from the positive terminal to the ignition terminal of the starter. This will simulate turning the ignition key.Interpreting Results
Watch and listen carefully as the starter engages. A good starter will spin vigorously and without hesitation. If it struggles or makes grinding noises, there’s likely an issue. An unexpected insight—sometimes, a faulty starter can still engage but not with enough force. Consider how this might affect your vehicle’s performance. Does the starter fail to engage at all? This could point to a more significant electrical issue. Testing a starter can be enlightening, providing a deeper understanding of your vehicle’s health. Did the results surprise you? With this knowledge, you’re better equipped to decide your next steps.Credit: www.wikihow.com
Troubleshooting Common Issues
Understanding how to troubleshoot a car starter can save you time and money. Identifying common issues ensures your vehicle starts smoothly. This section delves into frequent problems, offering practical solutions. Let’s explore key aspects of starter testing.
Starter Motor Problems
The starter motor is crucial for starting your car. Issues here often prevent your engine from cranking. A clicking sound might indicate a faulty starter motor. Sometimes, the motor might fail to engage at all. Check for loose wires or connections. Corrosion can hinder the motor’s function too. Replacing the motor may be necessary if problems persist.
Battery And Charging Issues
A weak battery affects the starter’s performance significantly. Test the battery voltage using a multimeter. Ideally, it should read 12.6 volts or more. If the battery is low, recharge it fully. Check the alternator to ensure it’s charging the battery correctly. Faulty alternators can drain the battery quickly. Inspect battery terminals for corrosion or loose connections. Clean them for better contact and performance.
When To Seek Professional Help
Sometimes, testing a car starter might not be straightforward. You might feel unsure about the results. In such cases, seeking professional help is wise. A mechanic brings expertise and tools you might lack. Knowing when to consult a professional can save time and money.
When The Starter Makes Unusual Noises
If the starter makes grinding or clicking sounds, it might be faulty. These noises suggest internal issues. A professional can diagnose and fix these problems accurately.
When The Engine Fails To Crank
An engine that doesn’t crank often signals starter trouble. A mechanic can determine if the starter is the root cause. They can also identify other potential issues.
When You Notice Frequent Battery Drain
If your battery drains often, the starter might be overworking. This could indicate a malfunction. An expert can assess the starter’s condition and suggest solutions.
When Diy Methods Don’t Work
Attempted to test the starter yourself without success? It’s time for professional assistance. A mechanic has the right tools and knowledge for accurate testing.
When Electrical Problems Persist
Persistent electrical issues can hint at starter problems. A professional can verify if the starter is causing these issues. They can also check for other electrical faults.
Frequently Asked Questions
How To Test If A Starter Is Bad?
Test a starter by checking for a clicking sound when turning the key. Inspect connections and battery voltage. Use a multimeter to measure voltage drop. Ensure the starter motor receives power. If problems persist, consider professional evaluation.
Can You Test A Starter Without Removing It?
Yes, you can test a starter without removing it. Use a multimeter to check voltage and current. Listen for clicking sounds, indicating it might be faulty. Check all connections for tightness and corrosion. This ensures the starter’s proper functionality without disassembly.
Can Autozone Test Starters?
Yes, AutoZone can test starters. They offer free starter testing services at their stores. Customers can bring their starters to check if they are functioning properly. This service helps diagnose starter-related issues without any cost.
Can You Jump A Car With A Bad Starter?
Jump-starting a car with a bad starter is unlikely to work. The starter needs repair or replacement. A jump-start provides power to the battery, not the starter. Check connections and consult a mechanic for further assistance.
Conclusion
Testing a car starter might seem hard, but it’s simple. Begin with basic checks. Look at the battery and connections. Listen for clicking sounds. These steps help find starter problems. Fixing early saves bigger repairs later. Always use caution around car parts.
If unsure, ask for help from a mechanic. Regular checks keep your car running well. Knowledge of basic car checks empowers you. Safe driving depends on a healthy starter. Keep these tips in mind. Your car will thank you with reliable starts.