


Have you ever faced the frustration of turning your car key, only to hear a disheartening click or nothing at all? You’re not alone.
A faulty starter can easily ruin your day, leaving you stranded and stressed. But, what if you could tackle this issue head-on with a simple test? Imagine the peace of mind knowing that you can identify starter problems before they escalate, saving time and money.
This article is crafted with you in mind, focusing on straightforward steps to test your car’s starter. Dive in and discover how you can regain control, ensuring your car is always ready when you are. Your journey to becoming a more confident car owner starts here.

Credit: www.wikihow.com
Tools And Materials Needed
Testing a car starter requires specific tools and materials. Having the right tools ensures accurate diagnosis and safety. This section lists essential items you need.
1. Digital Multimeter
A digital multimeter measures voltage, current, and resistance. It’s crucial for testing the starter’s electrical connections. Ensure it is functioning properly before use.
2. Socket Set
A socket set helps remove bolts and nuts. It’s vital for accessing the starter. Choose a set with various sizes for versatility.
3. Wrench Set
A wrench set assists in loosening and tightening. It’s useful for different parts of the starter. Ensure the set includes both metric and standard sizes.
4. Jumper Cables
Jumper cables provide power from the battery. They help test the starter’s operation. Choose cables with heavy-duty clamps.
5. Safety Gloves
Safety gloves protect your hands. They shield against electrical shocks and sharp edges. Opt for gloves with a good grip.
6. Safety Goggles
Safety goggles protect your eyes from debris. They are essential during any car maintenance. Ensure they fit comfortably and securely.
7. Cleaning Cloth
A cleaning cloth wipes away dirt and grease. It helps maintain a clean workspace. Use a durable, lint-free cloth.
8. User Manual
The car’s user manual provides specific guidance. It helps identify starter components. Always refer to it for accurate information.
Safety Precautions
Checking a car starter involves safety precautions like disconnecting the battery to prevent electric shocks. Use protective gear to guard against injuries. Ensure tools are insulated to avoid accidental short circuits.
When testing the starter on a car, safety should be your top priority. Handling car components can be risky if you’re not careful. Without the right precautions, you could face injury or damage to your vehicle. Whether you’re a seasoned mechanic or just a curious car owner, understanding these safety measures is crucial.1. Ensure The Car Is In Park Or Neutral
Before you start any testing, make sure your vehicle is in park (for automatic transmissions) or neutral (for manual transmissions). This step prevents the car from accidentally moving while you’re working on it.2. Disconnect The Battery
Always disconnect the negative battery cable before testing the starter. This simple step can prevent electrical shocks or short circuits. It’s a small action that can save you from a potential hazard.3. Wear Appropriate Safety Gear
Equip yourself with safety goggles and gloves. This gear protects your eyes and hands from debris or accidental sparks. You might think it’s overkill, but it’s better to be safe than sorry.4. Be Mindful Of Your Surroundings
Work in a well-ventilated area, away from flammable materials. Being aware of your environment can prevent unexpected accidents. Remember, safety isn’t just about what you’re doing but also where you’re doing it.5. Use Proper Tools
Having the right tools can make a significant difference. Using improper tools can lead to slips or damage to the starter. Invest in a good set of tools if you plan to work on your car regularly.6. Double-check Everything
Before proceeding with the test, ensure all connections are secure and there are no loose wires. Double-checking can catch potential issues early. It’s a simple habit that can prevent frustration later. By focusing on these safety precautions, you set the foundation for a successful starter test. Have you ever skipped a safety step and regretted it? Taking a few moments to prepare can save you hours of trouble.Locate The Starter
Finding the starter in your car might seem daunting if you’re not familiar with auto mechanics. But don’t worry, it’s simpler than you think. Knowing the starter’s location is crucial for diagnosing any issues or replacing the part. It’s often hidden beneath other components, but with a bit of guidance, you’ll locate it like a pro.
Why Finding The Starter Matters
Locating the starter is the first step in testing it. If your car won’t start, the starter might be the culprit. Finding it allows you to inspect and assess its condition. This knowledge can save you time and money on repairs.
Imagine being stranded because your car won’t start. Understanding where the starter is lets you troubleshoot and potentially fix the problem right away. Empower yourself with this knowledge.
Tools You Might Need
Before you start, gather a few basic tools. A flashlight can help you see in dark engine spaces. A wrench set will be essential for removing any bolts or screws. Gloves are recommended to protect your hands from sharp edges and grime.
You don’t need to be a mechanic to handle these tools. They’re simple, everyday items that will make your task easier. Don’t hesitate to ask a friend or consult a manual if you’re unsure.
Steps To Locate The Starter
Start by opening the hood and securing it with the hood prop. This gives you full access to the engine bay. Look for the battery, typically located near the front of the engine compartment.
Trace the thick red cable leading from the battery. This cable connects directly to the starter, guiding you to its location. The starter is usually found on the engine block, near the transmission.
If you’re having trouble, consult your car’s manual for diagrams. These can provide a clearer picture of the starter’s location. Each car is different, so a little patience might be required.
Questions To Consider
As you work, ask yourself a few questions. What condition is the starter in? Are the connections tight and free of corrosion? Is the area around the starter clean?
These questions can lead to insights about potential issues. If something seems off, it might be time to consult a professional. Your observations can make a significant difference in diagnosing starter problems.
Common Challenges
Finding the starter might be tricky if it’s obscured by other components. In some cars, you may need to remove additional parts to see it clearly. This can include air filters or engine covers.
Don’t let this discourage you. Taking your time and working methodically will help you succeed. Remember, every challenge is an opportunity to learn more about your car.
Locating the starter is a small step, but it opens the door to deeper understanding and maintenance. Are you ready to take the plunge and become more familiar with your car’s inner workings?
Credit: www.youtube.com
Inspect The Starter
Testing a car starter involves checking its connection, listening for clicking sounds, and measuring voltage with a multimeter. Ensure the battery is charged, then observe the starter’s response when turning the ignition. These steps help identify potential issues in the starter system.
Inspecting the starter on a car is a crucial step in identifying potential issues before they escalate. You might find yourself stuck one morning with a car that refuses to start. Knowing how to inspect the starter can save you both time and money. This process is straightforward and can often be done with tools you already have at home. Let’s dive into the details of inspecting your car’s starter.Visual Inspection
Start by taking a good look at the starter itself. Ensure the area is well-lit, or use a flashlight to see clearly. Look for any obvious signs of wear, such as cracks or corrosion on the starter body. Notice if there are any unusual stains around the starter. Oil leaks can damage the starter over time. If you spot oil, it might be worth checking for leaks in nearby engine components. Consider how the starter looks compared to the rest of the engine. Does it appear significantly older or more worn out? This might indicate it has been working overtime and could be nearing the end of its lifespan.Check For Loose Connections
Loose connections can cause a starter to malfunction. Grab a wrench and gently check the tightness of the bolts connecting the starter to the engine. They should be snug but not overly tight. Inspect the electrical connections as well. Ensure that the wires leading to the starter are secure and free from fraying. A loose wire can prevent the starter from receiving the power it needs. Have you ever experienced a flickering dashboard light or a sluggish start? These might be signs of an electrical issue related to the starter connections. Ensuring these are tight and clean can often solve the problem. By performing these simple checks, you can catch starter problems early. Wouldn’t you rather spend a few minutes inspecting your starter than waiting for a tow truck?Testing The Starter
Testing a car’s starter involves checking for power and sound. Listen for clicking noises or silence. Use a multimeter to measure voltage at the starter terminals. Low voltage indicates a problem.
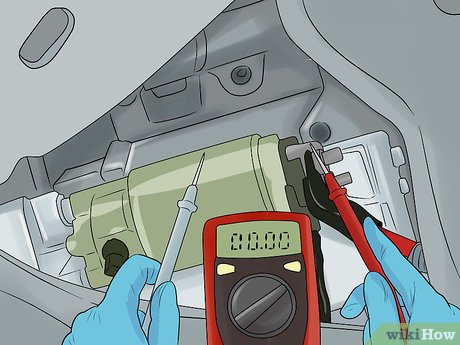
Testing the starter on a car can feel like a daunting task, especially if you’re not a seasoned mechanic. Yet, understanding how to do it can save you time and money. Imagine being stranded in a parking lot, unsure if the problem is the battery or the starter. Knowing how to test the starter can give you peace of mind and help you diagnose the issue quickly. ###Using A Multimeter
A multimeter is an invaluable tool for testing a starter. It measures voltage, allowing you to see if your starter receives the necessary power. First, ensure your car is off and safely parked. Connect the multimeter’s red probe to the positive terminal of the starter and the black probe to the ground. Set your multimeter to the voltage setting. Have someone turn the ignition key while you check the reading. You should see a reading between 9.5 to 12 volts. If the voltage is low, the starter might not be the culprit. ###Performing A Jump Test
The jump test is another straightforward method to test your starter. This requires a fully charged battery or a jump starter. First, ensure the car is in park or neutral with the parking brake engaged. Connect the jump starter’s cables directly to the starter terminal and ground. Turn the ignition key. If the engine cranks, your starter is likely in good shape. If it doesn’t, the starter may need replacement. Have you ever tried this simple test and found your car roaring back to life? It’s like a wake-up call for your engine. Testing the starter doesn’t require a mechanic’s degree. With a multimeter and a jump test, you can tackle this challenge and diagnose your car with confidence. Next time your car won’t start, you’ll know exactly what to do.Analyzing Test Results
Testing a car starter involves checking for proper function and connection. Begin by ensuring the battery is charged. Listen for clicking sounds when turning the key. This may indicate an issue. Use a multimeter to check voltage. Confirm connections are secure.
Follow these steps to analyze results effectively.
Analyzing test results is crucial after testing a car starter. Proper analysis helps determine if the starter needs repair or replacement. Understanding the data ensures accurate diagnosis. Let’s delve into interpreting multimeter readings and identifying signs of a faulty starter.Interpreting Multimeter Readings
A multimeter measures voltage, current, and resistance. To test a car starter, set the multimeter to the appropriate voltage range. Connect the multimeter probes to the battery terminals. A healthy battery shows around 12.6 volts. Next, test the starter circuit. Connect the red probe to the starter’s positive terminal. Place the black probe on the starter’s ground. Start the car and observe the reading. A reading between 9.6 and 10 volts indicates a functioning starter. Lower readings suggest a weak starter.Signs Of A Faulty Starter
Recognizing signs of a faulty starter can save time and money. Listen for a clicking sound when turning the key. This may indicate a starter issue. The engine may crank slowly or not at all. Another sign is visible smoke from the engine bay. This suggests the starter is overheating. Unusual grinding noises also point to starter problems. If these signs appear, further investigation is necessary.Common Starter Issues
Experiencing car troubles can be frustrating, especially when you’re unsure where the problem lies. One common culprit is the starter. But before you can test it, you need to understand the typical issues that might be affecting its performance. Knowing these can save you both time and money.
Electrical Problems
Electrical problems are often at the root of starter issues. Imagine you’re all set to head out, but your car just won’t start. The culprit might be a dead battery or a faulty connection.
Check the battery first. A simple voltmeter can help determine if it’s providing adequate power. If the battery is fine, inspect the connections. Loose or corroded wires can disrupt the flow of electricity. Tighten any loose ends and clean any rust with a wire brush.
Ever had the feeling you’ve done everything right, but still face issues? A worn-out solenoid could be the hidden cause. It’s crucial to check this component, as it controls the electrical current to the starter motor.
Mechanical Failures
Mechanical failures can be tricky. Your starter might click, but the engine doesn’t crank. This often signals a problem with the starter motor itself.
The starter motor is like a tiny powerhouse. If its gears are worn or jammed, it won’t engage the engine effectively. You might need to remove it to inspect for any visible damage or wear.
Have you ever wondered why your car sometimes struggles more in cold weather? This is because thickened oil can impede the starter motor’s ability to turn the engine. Regular maintenance checks can help prevent this.
How many times have you been caught off guard by unexpected car issues? By knowing these common starter problems, you can be better prepared and potentially avoid a roadside breakdown.
Troubleshooting Tips
Testing a car starter can be challenging. The process requires patience and attention. Discovering what’s wrong can save time and money. Knowing some troubleshooting tips can be helpful.
Simple Fixes
Check the battery first. A dead battery might be the problem. Ensure all cables are tightly connected. Inspect for corrosion on battery terminals. Clean them if needed. Listen for clicking noises. This might indicate a faulty solenoid. Tap lightly on the starter. Sometimes, this can temporarily fix the issue.
When To Seek Professional Help
If the engine won’t start, it might be serious. Smoke or burning smells are warning signs. These need expert attention. Strange noises during ignition require a mechanic. A faulty starter can drain the battery. If simple fixes don’t work, it’s time for a professional. Avoid further damage by consulting an expert.
Preventative Maintenance
Testing a car starter involves checking the battery, connections, and solenoid. Listen for clicks when turning the key. Use a multimeter to measure voltage drop, ensuring the starter receives enough power.
Preventative maintenance is the secret sauce to keeping your car’s starter in tip-top shape. It’s like brushing your teeth daily; you avoid the dentist by taking small steps regularly. Maintaining your starter isn’t just about preventing breakdowns, it’s about ensuring a smoother, worry-free driving experience. ###Regular Inspection
Regularly inspecting your car’s starter can save you from unexpected headaches. Check for any unusual noises, like grinding or clicking sounds when you start your car. If you notice anything off, it might be time to dig deeper. A simple visual check can reveal a lot. Look for signs of wear or corrosion around the starter. These are red flags that shouldn’t be ignored. Have you ever been stuck in a parking lot with a car that won’t start? A quick inspection now could prevent that inconvenient scenario. ###Keeping Connections Clean
Clean connections are crucial for your starter’s health. Dirt and corrosion can disrupt the flow of electricity, making it harder for your car to start. Start by disconnecting the battery before cleaning. This ensures safety while you work on the connections. Use a wire brush to gently clean the terminals and connectors. A clean connection ensures efficient energy flow, reducing strain on the starter. Have you checked your car’s connections recently? A few minutes of cleaning can extend the life of your starter significantly. Maintaining your car’s starter isn’t rocket science. It’s about being proactive and attentive to small details. By staying on top of regular inspections and keeping those connections clean, you’re not just maintaining your car—you’re investing in your peace of mind.Credit: www.youtube.com
Frequently Asked Questions
How To Test If A Starter Is Bad?
To test a starter, check for clicking sounds when turning the key. Ensure battery and connections are good. Use a multimeter to measure voltage drop. Inspect for smoke or burning smells. A failed starter often prevents engine cranking. Seek professional help for accurate diagnosis if needed.
Can You Test A Starter Without Removing It?
Yes, you can test a starter without removing it. Use a multimeter to check voltage and connections. Listen for unusual sounds while starting the engine. Inspect wiring and battery health. This process helps diagnose issues without disassembly. Always ensure safety precautions when testing electrical components.
What Is The Indicator Of A Bad Starter?
A bad starter often causes the engine to crank slowly or not at all. Clicking sounds or grinding noises can indicate starter issues. Dim headlights or electrical problems might also be signs. Regular maintenance can help avoid starter problems. Check the battery and starter connections for proper function.
Will Autozone Test A Starter?
AutoZone offers free testing for your car’s starter. Visit a nearby AutoZone store for assistance. Their staff can help diagnose starter issues quickly and provide recommendations for replacements if necessary. Check their website for store locations and more information on available services.
Conclusion
Testing a car starter is crucial for car maintenance. It helps identify issues early. Follow simple steps to check the starter. First, ensure the battery works. Listen for clicking sounds when turning the key. Use a multimeter to check voltage.
Also, inspect connections and wires for damage. These steps help diagnose starter problems. Regular checks prevent future issues. Keeping your starter in good condition saves time and money. Remember, a healthy starter means a reliable car. Stay proactive with car maintenance.
It ensures smooth and safe drives.