


Imagine you’re ready to head out for the day, but when you turn the key in your car’s ignition, nothing happens. Frustrating, right?
This could be a sign that your car’s starter needs testing. If you’re wondering how to do that without heading straight to the mechanic, you’re in the right place. Testing a starter on your car might sound technical, but with a little guidance, you can get to the bottom of what’s preventing your engine from roaring to life.
You don’t need to be a car expert to understand the basics; all it takes is some patience and the right information. By the end of this article, you’ll know whether your starter is the culprit and what steps to take next. Let’s dive into the process and save you time, money, and stress.
Tools And Materials Needed
Gather basic tools like a multimeter, wrench set, and jumper cables. Essential materials include safety gloves and protective eyewear. Ensure access to the car’s battery and starter for effective testing.
Testing a starter on your car can be a straightforward task with the right tools and materials. Understanding what’s needed not only saves time but ensures a smoother process. Whether you’re a seasoned mechanic or a beginner, having these essentials at hand can make all the difference in diagnosing starter issues effectively. Let’s dive into what you need to get started. ###Essential Tools
First up, you’ll need a multimeter. This handy tool measures electrical voltage and current, helping you check the battery’s voltage and the starter’s connection. If your starter isn’t working, a multimeter can reveal if the problem lies in the electrical system. A socket wrench set is crucial. Starters are often bolted tightly in place, and a reliable socket wrench ensures you can remove and replace the starter without hassle. Different cars have varied bolt sizes, so a comprehensive set is a lifesaver. Consider a car jack and stands. Safety is paramount. Lifting your car with a jack and securing it with stands provides easy access to the starter underneath. It’s vital for avoiding accidents and ensuring you can work comfortably. ###Materials Needed
Replacement starter: If testing reveals that your starter is faulty, having a replacement ready can save time. Research which starter fits your car model; this prevents compatibility issues and ensures smooth installation. Battery terminals: Sometimes, the issue isn’t the starter itself but the battery connections. Corroded or damaged terminals can mimic starter problems. Having new terminals on hand can prevent unnecessary starter replacements. Electrical tape: This is useful for securing loose wires or insulating exposed connections during testing. It’s a simple yet effective solution to minor electrical issues. ###Safety Equipment
Gloves are a must. Protecting your hands while working with electrical components is essential. They also provide grip, making tool handling easier. Safety goggles protect your eyes. Working under the car or dealing with electrical parts can pose risks. Goggles ensure you’re safeguarded against unexpected splashes or debris. ###Additional Tips
Before starting, ensure your workspace is well-lit and organized. A clutter-free area reduces stress and confusion during the testing process. If you’re unsure about a particular tool or material, don’t hesitate to ask for advice at your local auto shop. They’ve seen it all and can provide valuable insight. Have you ever struggled with a task because you lacked the right equipment? Equipping yourself properly can make testing a starter not only possible but enjoyable. What tools do you find indispensable in your car repair kit?Safety Precautions
Testing a starter on the car requires safety precautions to prevent accidents and injuries. Turn off the ignition and disconnect the battery before starting. Ensure the vehicle is in park or neutral and use protective gear, like gloves and safety glasses, to protect yourself during the process.
Testing a car starter might seem like a straightforward task, but without the proper safety precautions, it can quickly turn hazardous. It’s essential to approach this task with a clear understanding of potential risks and how to mitigate them. Your safety should always come first, so taking the time to prepare can save you from unexpected mishaps. ###Wear Protective Gear
Before you start, ensure you’re wearing the right protective gear. Safety goggles are crucial to protect your eyes from sparks or debris. Gloves can prevent burns or cuts, especially if you’re handling metal parts. Think of these as your first line of defense against any accidents. ###Disconnect The Battery
Always disconnect the car’s battery before you begin any work. This simple step can prevent accidental shocks or short circuits. If you’re unsure how to disconnect it, check your car’s manual. Remember, it’s better to be safe than sorry. ###Work In A Well-ventilated Area
Testing a starter can sometimes release harmful fumes. Ensure you’re working in a well-ventilated area to avoid inhaling any toxic substances. If you’re in a garage, open the doors and windows to let fresh air circulate. ###Keep A Fire Extinguisher Nearby
Electrical components can pose a fire risk. Having a fire extinguisher within reach can be a lifesaver. Make sure it’s suitable for electrical fires, and check its expiration date regularly. ###Be Aware Of Moving Parts
Stay alert to any moving parts around the engine. Loose clothing or jewelry can get caught, leading to injuries. Roll up your sleeves and remove any accessories that might pose a hazard. ###Use The Right Tools
Using the correct tools is vital for both effectiveness and safety. The wrong tool can damage your car or slip, causing injury. Invest in a good set of mechanic’s tools and make sure they’re in good condition. ###Have A First Aid Kit Ready
Accidents can happen even with precautions. Keep a first aid kit nearby to handle minor injuries. Knowing you have it on hand can provide peace of mind and encourage safe working habits. Taking these steps isn’t just about avoiding accidents—it’s about ensuring you complete the task confidently and efficiently. How do you usually prepare for tasks involving your car? Share your safety tips in the comments!Locating The Starter
Finding the starter involves checking the engine bay, usually near the gearbox. Identifying it correctly helps in testing its functionality. This simple process ensures your car starts smoothly.
Locating the starter in your car might seem like a daunting task, but with a little guidance, you can make it a straightforward process. Understanding where the starter is located can save you time and frustration, especially if you’re facing issues with starting your vehicle. This section will walk you through the steps of finding the starter, ensuring you’re well-equipped to tackle any problems that may arise.What Is A Starter?
The starter is a small motor that plays a big role in starting your car. It is responsible for turning the engine over and getting it running. You might have heard a clicking sound when you turn your key, which indicates the starter is working. If you’re hearing only clicks and the engine doesn’t start, your starter might need attention.Where To Start Searching?
Begin by popping the hood of your car. Look for the battery first, as the starter is usually located nearby. It’s often mounted to the engine block. You might need a flashlight to see clearly, especially if it’s tucked away in a hard-to-reach spot.Recognizing The Starter
The starter is typically cylindrical and connected to the flywheel or flexplate. It has cables running to it from the battery. Don’t confuse it with the alternator, which is also connected to the engine but serves a different purpose. The starter will have a solenoid attached to it, which is another distinctive feature to help in its identification.Tools You Might Need
A socket wrench can be handy if you need to remove any components to access the starter. Gloves are also advisable to protect your hands from grease and grime. A multimeter can be useful to check the electrical connections if you’re troubleshooting starter issues.Checking Accessibility
Sometimes, the starter is positioned in a way that requires you to remove other parts to access it. This could include the air filter or other engine components. Assess how easily you can reach the starter before deciding to proceed. If it’s buried deep, you might need to consult your car’s manual or seek professional help.Why Locate The Starter?
Knowing where the starter is can empower you to diagnose starting issues swiftly. If your car won’t start, you can quickly check the starter connections before taking further action. This knowledge can save you from unnecessary trips to the mechanic and help you understand your vehicle better. Locating the starter might seem tricky at first, but with patience and the right approach, you can master it. Have you ever faced issues with your car starting? Could it have been a starter problem? Next time, try locating it yourself—it might be easier than you think!Checking Battery And Connections
Testing a car starter involves more than just turning the key. A crucial part is checking the battery and its connections. The battery’s health and the connections’ integrity ensure a smooth engine start. Ignoring these can lead to frustrating issues.
Inspecting Battery Health
Start by examining the battery for visible damage. Look for cracks or bulges on its surface. These signs often indicate internal issues. Measure the voltage using a multimeter. A healthy battery should read around 12.6 volts. A lower reading suggests a weak battery. Consider testing the battery under load. This helps confirm if it holds charge during operation. Clean the terminals if you see corrosion. Use a mixture of baking soda and water for this. Rinse with clean water and dry thoroughly.
Tightening Loose Connections
Loose connections can cause starting problems. First, check the battery cables. Ensure they are securely attached to the terminals. Use a wrench to tighten them if necessary. Wiggle the cables slightly to test their security. Inspect the cable ends for wear or fraying. Replace them if they show significant damage. Check the ground connection from the battery to the car’s body. A loose ground can disrupt the electrical flow. Tighten this connection to ensure a solid contact. This step often solves many starter issues.
Testing With A Multimeter
Testing your car starter with a multimeter is a practical way to diagnose electrical issues. Multimeters are versatile tools that measure voltage, current, and resistance. Understanding how to use one can save you time and money. Imagine the convenience of identifying a starter problem on your own, without needing to rely on a mechanic every time your car fails to start. Let’s dive into how you can set up a multimeter and interpret voltage readings to gain insights into your car’s starter health.
Setting Up The Multimeter
First, ensure your multimeter is in working condition. If it’s been collecting dust in your toolbox, a quick battery check might be needed. Set your multimeter to the voltage setting, usually indicated by a “V” symbol.
Connect the black probe to the common port and the red probe to the voltmeter port. This simple setup ensures accurate readings. Now, you’re ready to test your car starter. Have you ever wondered why your car struggles to start on cold mornings? Testing the starter with a multimeter can reveal if the battery voltage is dropping too low.
Interpreting Voltage Readings
Attach the multimeter probes to your car battery terminals. A healthy battery typically reads around 12.6 volts when the car is off. If it’s significantly lower, your starter might not receive enough power to function properly.
Next, turn the ignition key to start the car. Observe the voltage drop; it shouldn’t fall below 9.6 volts. If it does, your starter may be drawing too much current, indicating a possible fault. Have you ever experienced a clicking sound when trying to start your car? This sound could be a clue that your starter isn’t getting enough juice.
Regularly testing your starter can prevent unexpected breakdowns. It’s empowering to solve car issues yourself, isn’t it? Knowing how to interpret multimeter readings gives you the confidence to tackle other electrical problems in your vehicle. So, what’s stopping you from trying it out?

Credit: www.wikihow.com
Performing A Jump Start Test
Jump starting a car is a straightforward method to test a starter. It helps determine if the starter is causing the engine trouble. With the right tools and some basic knowledge, you can perform a jump start test safely. This process is useful if your car struggles to start or makes clicking sounds.
Setting Up Jumper Cables
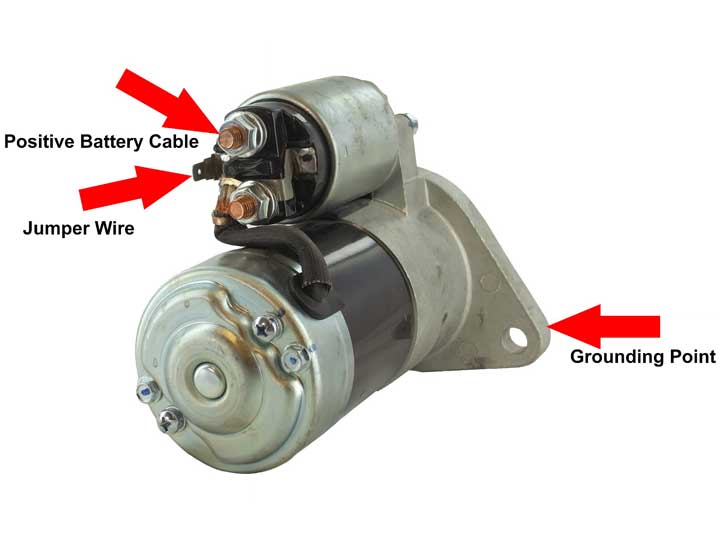
Jumper cables are essential tools for jump starting a car. First, park a working vehicle close to the car with the dead battery. Ensure both vehicles are turned off and in park or neutral. Open the hoods of both cars and locate the batteries.
Attach one red clamp to the positive terminal of the dead battery. Connect the other red clamp to the positive terminal of the working battery. Next, attach one black clamp to the negative terminal of the working battery. Finally, connect the last black clamp to an unpainted metal surface on the car with the dead battery. This prevents sparks near the battery.
Assessing Starter Performance
Once the jumper cables are set, start the working vehicle. Let it run for a few minutes to charge the dead battery. Try to start the car with the dead battery. If the engine starts, the starter might be fine. If the car struggles or doesn’t start, the starter could be faulty.
Listen for unusual sounds while turning the ignition. A clicking sound might indicate a starter issue. Observe how the engine reacts. If it turns over slowly, the starter might be weak. This process helps determine if the starter needs attention.
Using A Remote Starter Switch
Testing a car starter becomes easier with a remote starter switch. Connect it directly to the starter motor. This allows you to safely check if the starter is functioning without being inside the car. It’s a straightforward method for diagnosing starter issues.
Testing a starter on your car can be both rewarding and crucial for understanding your vehicle’s health. One practical method to test your car starter is by using a remote starter switch. This tool allows you to start your engine without being inside the car, making it easier to diagnose any issues. You might be wondering how exactly you can perform this test. Let’s break it down into simple steps. ###Connecting The Switch
Begin by gathering your tools. You’ll need a remote starter switch, which is inexpensive and available at most auto parts stores. Before you proceed, ensure your car is in park with the parking brake engaged for safety. Locate the starter solenoid near your car’s engine. It’s usually a small cylindrical component attached to the starter motor. Connect one clip of the remote starter switch to the positive terminal of the solenoid. Attach the other clip to the S terminal. By doing so, you create a direct circuit to test the starter. Does this process seem straightforward? It’s simpler than you might think and saves you a trip to the mechanic. ###Observing Starter Response
With the remote starter switch connected, it’s time to observe how your starter responds. Stand clear of moving parts and ensure the switch is in your hand. Press the button on the remote starter switch. Listen closely to the starter’s sound. A healthy starter will crank the engine smoothly. If you hear a clicking sound or if the starter fails to engage, this could indicate a fault in the starter motor or solenoid. Take note of any unusual noises. Is the starter struggling or making grinding sounds? These are signs you should address promptly. Testing your starter using a remote switch gives you control and insight into your car’s condition. Have you ever tried this method? If not, why not give it a go next time you suspect starter issues? This small tool can offer big help in diagnosing your car’s health.Credit: www.wikihow.com
Evaluating Starter Relay
Testing a starter relay ensures the car’s ignition system functions properly. Begin by locating the relay in the vehicle. Use a multimeter to check for continuity, ensuring smooth power flow.
Evaluating the starter relay is a crucial step in diagnosing car starting issues. This small but significant component is often the bridge between your ignition switch and the starter motor. When your car doesn’t start, the relay might be the hidden culprit. Testing it is a simple process that can save you a trip to the mechanic. Let’s dive into how you can evaluate the starter relay effectively.Identifying The Relay
First, you need to find the starter relay in your vehicle. It’s often located in the fuse box under the hood. Consult your vehicle’s manual to pinpoint its exact location. Once located, inspect the relay for signs of damage or wear. Look for corrosion or burn marks, which can indicate a problem. Have you ever struggled to find a specific part under the hood? It can be frustrating, but taking a few extra minutes to consult the manual can save time and effort.Testing Relay Functionality
Testing the relay is straightforward. You can use a multimeter to check for continuity. Set the multimeter to the continuity setting and connect it to the relay terminals. If the multimeter beeps, the relay has continuity and is likely functional. No beep? The relay might be faulty and need replacement. Want a quick way to verify? Swap it with a similar relay from a non-essential system in your car, like the horn. Does your car start now? If so, you’ve likely identified the problem. This simple test can often resolve starting issues without further hassle. Have you ever used a multimeter before? It’s a handy tool every car owner should have, making troubleshooting much easier.Signs Of A Faulty Starter
Identifying a faulty starter involves checking several key signs. Listen for unusual clicking or grinding noises when turning the ignition. Notice dimming dashboard lights or a sluggish engine crank, which may indicate starter issues.
Testing a starter on your car is crucial to ensuring a reliable driving experience. Imagine getting in your car, ready to start your day, only to find it won’t start. This often indicates a faulty starter. Recognizing the signs early can save you from unexpected breakdowns and costly repairs. Understanding these signs helps you address issues promptly. ###Unusual Noises
When you turn the key, do you hear a grinding sound or a clicking noise? These are red flags. A grinding noise often means that the starter drive gear is worn out or not engaging properly. Clicking usually indicates insufficient power reaching the starter. I once ignored a clicking sound, thinking it was just the cold weather. A few days later, my car refused to start in the middle of a busy parking lot. Don’t let small noises slide; they might be your starter’s way of asking for help. ###Intermittent Starting Issues
Does your car start perfectly some days but struggles on others? This inconsistency is another sign of a starter problem. The issue might stem from a loose connection or a failing component within the starter itself. Imagine being late for an important meeting because your car decided it wouldn’t start that morning. Annoying, right? Ensure your starter connections are tight and corrosion-free. Have you experienced any of these symptoms? Addressing them now can prevent bigger problems later. Regular checks can provide peace of mind and keep your car running smoothly.Credit: www.youtube.com
Frequently Asked Questions
How To Test If A Car Starter Is Bad?
To test a car starter, listen for clicking sounds when turning the key. Check battery voltage and connections. Use a multimeter to measure starter voltage. Inspect starter relay and solenoid. Consult a mechanic for a thorough diagnosis.
Can I Test My Starter Without Removing It?
Yes, you can test your starter without removal. Use a multimeter to check voltage and listen for unusual sounds. Ensure all connections are tight and inspect for corrosion. Regular testing helps maintain performance and prevents potential issues. This method saves time and avoids unnecessary disassembly.
How Do You Test A Starter With A Multimeter?
Set your multimeter to the DC voltage setting. Connect the red probe to the starter’s positive terminal and the black probe to the negative terminal or ground. Have someone turn the ignition key. The multimeter should read 9-12 volts. Lower voltage indicates a starter or battery issue.
How Can I Get My Starter Tested?
Visit an auto repair shop to test your starter. A mechanic will inspect it using specialized diagnostic tools. They can identify any issues and recommend necessary repairs or replacements. Ensure your vehicle’s electrical system is working properly for accurate testing.
Conclusion
Testing a car starter is essential for vehicle maintenance. It ensures your car runs smoothly and starts without issues. Follow the steps carefully to identify any starter problems. A well-functioning starter saves you time and stress in the long run.
Regular checks can prevent unexpected breakdowns. Always be observant of unusual sounds or delays when starting your car. Addressing these early can prevent larger issues. Keeping your car in top shape is worth the effort. Enjoy peace of mind knowing your starter is reliable.
Happy driving!